
Traditional & Digital Scrapbooking; Store & Craft Supplies
Thursday, April 28, 2016
Wednesday, April 27, 2016
Parisian fabric page
Hello my friends..
today I want to share with you my Parisian fabric page that I created for our sweet Ms June.
To describe all elements of this page will be hard
I started with regular cotton fabric, stitched it on three sides and stuffed it with cushiony material
 I printed on cotton proper for this page side image of Parisian cafe with awning... and to make picture standing out even more I add cushioning under it as well....
 I went extra mile on working with image: I made out of fabric copy of awning and stuffed it with cushiony material; cut a slit under shop sign "Biscutteers" and tucked my awning under it. I covered fuzzy cut with beaded trim
I added two canvas post stamps as if this fabric page was a post card...
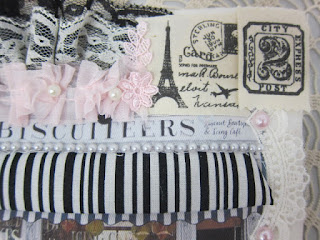

 The bow in the corner was very nice touch by the way (you can find that one at NSK as well)
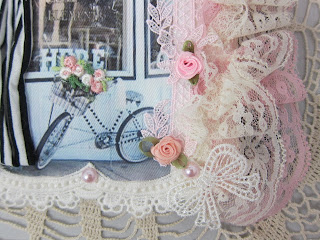
The back was made in the pocket by using another image of parisian shop.... and I used the same techniques and products to blend both sides in one project...
 I used the same fabric for created curtains that I used for the awning on 1st page, edged it with tiny lace, crinkled it and adhered around the door. Bicycle had a flower basket, so I added tiny rosette appliques on top of it.
 For a framing of this page I used the same technique as for the front page. And it happened to be that I had long enough piece of gathered layered lace to roll it into the flower and adding the pearl bead flower center.. came out just adorable...
 the border of the page I covered with scalloped lace from NSK, topped it with flat back pearls and along the right vertical side of the page I sprinkled tiny ribbon rosettes from NSK on top of delicate pink trim...
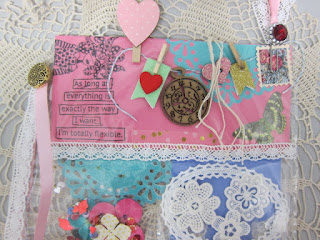
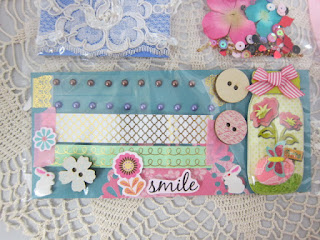
 and a pocket can't be empty, so I made few little goodie bags to go along with this beautiful fabric page
 Thank you for stopping by and spending some time with me!
Warmest hugs and best wishes!
Natasha
today I want to share with you my Parisian fabric page that I created for our sweet Ms June.
To describe all elements of this page will be hard
I started with regular cotton fabric, stitched it on three sides and stuffed it with cushiony material


I added two canvas post stamps as if this fabric page was a post card...

Working around the image was a bit challenging, because I wanted ruffly effect but clean... I think I achieved that. Plus adding another canvas "Take a picture" piece with tucked bow and bling Eiffel Tower pendant made it all flow together...

Around the picture I put one of my favs NSK laces and decorated with flat back pearls

The back was made in the pocket by using another image of parisian shop.... and I used the same techniques and products to blend both sides in one project...


Warmest hugs and best wishes!
Natasha
Sunday, April 24, 2016
Mother's day cards
Hello my friends,
today I want to share with you few cards that I made using free download images from internet
First 4 cards created in a shape of banner with different messages. I love how simple those are, but very elegant in the same time with a tiny flower on top and a tine bow...
 this cards I picked up at Michaels.... love that fancy die cutting.... I think when you have such an elegant image already, your embellishments and message should be very simple in order not to take attention away from card itself... so simple "just celebrate" on a flag banner should be just fine
 this card has double matting and I glittered few elements with stickles... what a loving message reads all the way across this card...Love it!
 ok, these cards have a little bit of creativity in it. I printed out the whole sheet of messages and hand cut those; colored with chalk pencils and mounted it with a pop up dot, spicing it with handmade flowers and heart stickers....
 this card is recycled.... I covered the message inside and added double bannered "happy birthday" message.. what a cute boy BD card!
 love how that series of cards came out...
 I used the same principle: printed image, twine and stickles for sparkle... Came out so darling!
 this card was a try out and I am not very happy about it. it was one of the free digi's (quality of print is very pure and size is very small) but an idea in all cool
 Thank you for stopping by and spending some time with me!
Hugs, Natasha
today I want to share with you few cards that I made using free download images from internet
First 4 cards created in a shape of banner with different messages. I love how simple those are, but very elegant in the same time with a tiny flower on top and a tine bow...


Hugs, Natasha
Pocket Letter for challenge
Hello my friends,
today I am coming to you with another project/entry to Gigi's challenge
It is my 3rd entry and it is a Pocket Letter
1st entry -


today I am coming to you with another project/entry to Gigi's challenge
It is my 3rd entry and it is a Pocket Letter
1st entry -
Shopaholic encouraging #Flip book
2nd entry -
Inspirational ATCs
And now is my pocket letter..


I think watching video would be more fun then me typing in here on what is what...
So please check out my YT!
Hugs and thank you for stopping by....
Thursday, April 21, 2016
Birthday gifts presentation & packaging!
Hello my friends,
I am always late.. so I am late with few BD gifts for my wonderful crafty sister Luisa Diaz
I did manage to make for her Decorative planner dividers, but the rest needed to be finished
So one day I had a burst of energy and I finished it all.
What I want to share with you it is presentation or gift packaging ideas.
Here we go!
 that's how it looks in a pile...


 Yummy!!!!!!!!!!
Let's take a closer look to few items
Prima Bloom Girls decorative dividers for planner you have seen already (click the link to that post above). Those were my inspiration for the rest of gifts...
I took empty packaging from Dollar Tree doilies and decorated the background with scraps, then pulled different doilies from my stash and sealed it with plastic. On the side I made a small altered paper clip. In all it looks so adorable.

 Well, altered paper clips are so much fun to make. You can use any little element: felt or paper or resin stickers, flowers, lace, paper, bling... anything that your heart desires. And those are such a sweet addition to your gift, because it is personalized to colors of your gift.


 But if making those is fun and easy task, presenting those might be challenging.....
What I came up with: I put those on my deck in order I liked those (it happened to be three rows of 4 PCs); then I took a 12 by 12 " paper and by overlapping it on top of layered PCs I cut out doubled size of paper, so I can cut slits for PCs on one half of the paper and fold another half behind those.
Let's imagine that I am working with 6 by 12 " paper piece...
I am cutting slits for each PC individually on the left side of 6 by 12" paper.
Put your metal ruler across paper long way and start bringing each paper clip placing it above your ruler and visually marking how big a slit must be.
Put your PC aside and cut that visual measurement with exacto knife.
Put your paper clip in the cut slit.
Then repeat above for the next PC and next row...
After you are happy with placing of your PCs fold right side of 6 by 12 " paper behind right PC display and you can glue it or leave just folded.
Hope it helps!
And of course you have to package that.
Cellophane bag with paper doily on top secured with another altered paper clip.. Looks nice!

 Next item on the list is.....
Altered salad container.... I just love using those!!!!!
1st you are recycling; 2nd all loose things are packaged and well presented; 3rd recipient can leave that packaging out in all times, because it is very pretty decoration and even after they use all the goodies inside, they can use it for storage of other items (having a lid preventing items from dust and moisture)
 I usually adhere two doilies on the lid and on the bottom part of container (inside and outside): total of 4 paper doilies.
From there you can take it by using your imagination and go as far as you like...
 I decided to create a colorful cluster of flowers and a small banner
 and topped it with cute paper bow...
 lets call this one done!!!
Next on the list are.......... storage cupcakes... OMG those deserve a separate post.. But I am not ready for it yet... ( I will share it when I have more time). Meanwhile you can check out my video on how I made those.
 those are 0 calories sweets for a birthday girl...
"DowNot" Be Afraid donuts, cupcake with cherry and ice cream
Of course we packaged ice cream in a cupcake box

 and my ice cream is a container with itself.. where I put pre made resin pieces...
 Oh so cute, right?!
And what is the gift w/o candy bars?
 how about another cupcake for a bouquet?


 Adorable!
Well now put it all together and you got yourself pretty cute little BD gifty!!!!!!!!!!
Enjoy!

I am always late.. so I am late with few BD gifts for my wonderful crafty sister Luisa Diaz
I did manage to make for her Decorative planner dividers, but the rest needed to be finished
So one day I had a burst of energy and I finished it all.
What I want to share with you it is presentation or gift packaging ideas.
Here we go!


Let's take a closer look to few items
Prima Bloom Girls decorative dividers for planner you have seen already (click the link to that post above). Those were my inspiration for the rest of gifts...
I took empty packaging from Dollar Tree doilies and decorated the background with scraps, then pulled different doilies from my stash and sealed it with plastic. On the side I made a small altered paper clip. In all it looks so adorable.


What I came up with: I put those on my deck in order I liked those (it happened to be three rows of 4 PCs); then I took a 12 by 12 " paper and by overlapping it on top of layered PCs I cut out doubled size of paper, so I can cut slits for PCs on one half of the paper and fold another half behind those.
Let's imagine that I am working with 6 by 12 " paper piece...
I am cutting slits for each PC individually on the left side of 6 by 12" paper.
Put your metal ruler across paper long way and start bringing each paper clip placing it above your ruler and visually marking how big a slit must be.
Put your PC aside and cut that visual measurement with exacto knife.
Put your paper clip in the cut slit.
Then repeat above for the next PC and next row...
After you are happy with placing of your PCs fold right side of 6 by 12 " paper behind right PC display and you can glue it or leave just folded.
Hope it helps!
And of course you have to package that.
Cellophane bag with paper doily on top secured with another altered paper clip.. Looks nice!


Altered salad container.... I just love using those!!!!!
1st you are recycling; 2nd all loose things are packaged and well presented; 3rd recipient can leave that packaging out in all times, because it is very pretty decoration and even after they use all the goodies inside, they can use it for storage of other items (having a lid preventing items from dust and moisture)

From there you can take it by using your imagination and go as far as you like...


Next on the list are.......... storage cupcakes... OMG those deserve a separate post.. But I am not ready for it yet... ( I will share it when I have more time). Meanwhile you can check out my video on how I made those.

"DowNot" Be Afraid donuts, cupcake with cherry and ice cream
Of course we packaged ice cream in a cupcake box

here you can see that those are two cute items


And what is the gift w/o candy bars?


Well now put it all together and you got yourself pretty cute little BD gifty!!!!!!!!!!
Enjoy!

Subscribe to:
Posts (Atom)