Hello my dear friends,
Many blessings to you and your loved once...
Today I would like to share with you few more Xmas projects (I am late on the very important date as usual - Alice in me... LOL).
I shared with you a Funky Xmas tree with legs and boots the other day. I am absolutely and madly in love with those....
So this one was made in Shabby Chic style, because it was a gift for a very shabby girl!


 So next item is very functional and I absolutely LOVE when I can achieve that in my projects...
I had a Christmas tea cup with beautiful printed word JOY on it for already several years... It's probably was gifted to me by someone, who I just can't recall and though while its brand new, it would be a wonderful base for my Shabby Chic scenery pincushion...
So I made separate from tea cup pincushion, so recipient can use both items separately, if she wants to or as displayed together.. love options and possibilities...
 Some items came from NSK, some from my personal stash....
For example those flatback pearls are NSK product and large doily as well
 layers of doilies with the last layer of Xmas crochet poinsettia... just beautiful..
 As for the scenery on top of the pincushion I choose shabby image of girl, tiny cardboard house and couple white Xmas trees...
 After decorating Xmas tree with Hobby Lobby tiny ornaments and scraps of ribbon & lace I added two doves that are hovering over the nest....
 By adding ceramic roses with a pearl spray I created a space for dove to lend w/o putting it into the nest....
 The image of shabby little girl I backed up with another paper and adhered it under layers of ribbons and laces...
 Using pieces/scraps of ribbons, netting, laces can give much fuller look to your project just by tucking it in along the whole project - here and there...
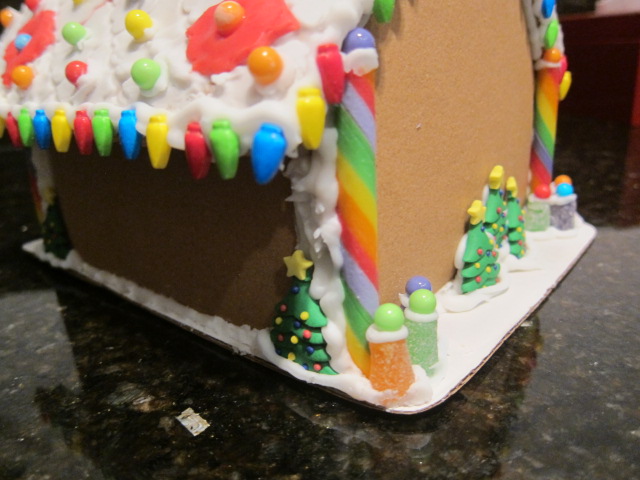
 The little cardboard house came from Xmas 2015 at Michaels ( I still have few left). Those are absolutely darling.... To spice that cookie, I added layers of lace to create a shingles look to the roof....
 came out absolutely adorable....
 sprinkling glitter or fake snow along the edges brings in that Christmasy snowy look and feel to the project...
 Here is another great dimensional element to the project: dangling lace - product of NSK ( we caring those in different colors)
 and here is another example of tucked scraps...

 Decorating Xmas trees with mini ornaments and resin flowers is almost as fun as decorating your real Christmas tree during holiday season...

 I hope you enjoyed these couple Christmas projects and maybe will mark this post on your next Christmas to do list...
I am off to celebrate New Year and Russian orthodox Christmas on January 7th!
Many blessings, Natasha
 To see time-lapse video of assembling pincushion please click here..
Many blessings to you and your loved once...
Today I would like to share with you few more Xmas projects (I am late on the very important date as usual - Alice in me... LOL).
I shared with you a Funky Xmas tree with legs and boots the other day. I am absolutely and madly in love with those....
So this one was made in Shabby Chic style, because it was a gift for a very shabby girl!


I had a Christmas tea cup with beautiful printed word JOY on it for already several years... It's probably was gifted to me by someone, who I just can't recall and though while its brand new, it would be a wonderful base for my Shabby Chic scenery pincushion...
So I made separate from tea cup pincushion, so recipient can use both items separately, if she wants to or as displayed together.. love options and possibilities...

For example those flatback pearls are NSK product and large doily as well


I am off to celebrate New Year and Russian orthodox Christmas on January 7th!
Many blessings, Natasha