Sunday, October 30, 2011

Halloween in Wonderland, card

This was just funky fun project...
Halloween Wonderland Card(1)
Everything starts pretty simple...Someone just asked a question about "those folded cards", and snap...Here is idea in progress...
Card (4)
Even if you don't have some stuff with you, it's always good to have a good friends cropping close by...
Card (3)
And the very end...
Card (2)
Ta-Da!!!!!
Happy Halloween card is done!!!
It just took me two weeks to blog about it...Ha!!!
Halloween Wonderland Card
$9.95
Happy Halloween!!!!!!!
P.S. You might like Halloween in Wonderland, box, cans, banners, bag. Just look for those on my blog or go to shopping


Pin It

Halloween in Wonderland, bag

That project was such a great idea, which came from nowhere...
I just wanted to have a Trick or Treat baggy to go with my Halloween in Wonderland theme...
Trick or Treat Bag(1)
While I was working on it, I decided to add a pretty lace that purchased at the store. I am telling you it was a job to put this lace around all bag...
Bag (3)
And even then I wasn't satisfied with the look, and added some sequence ribbon along the edge of the cut paper. As a result of it you can't see the cut edge of the paper, and two layers of it blend so well...
Bag (2)
As an embellishment I did couple tags from the same theme Halloween in Wonderland paper by Graphic 45 on the Tim Holtz chain, plus cute little bow made out of different ribbons on the opposite side of the bag.
I hope you like it! Happy Halloween!
Trick or Treat Bag
$21.30
P.S. Look for Halloween in Wonderland, cans, box, card...


Pin It

Friday, October 28, 2011

Halloween in Wonderland Box

Here we go; I told you that the minute my Love will be back he'll take me for the next ride... It happened again! The board came, and we unpacked it, and looked through it, put next to the wall and looked again.... Sat down and had a conversation about who is going to paint the board and which color...
Does it happen to all of us? Or I am just the luckiest one?!
Anyway, I am determined to finish all my posts before Halloween... Saturday I am going to the Halloween crop party (and yes I am going to be.....drums.... Alice), Sunday need to put outside decorations up (forecast for the weekend - rain, rain and some more rain, so can't do it now).
Here is the pearl of this Halloween collection, The Halloween in Wonderland Box
Halloween in Wonderland Box(1)
The idea came from one of the idea books of Pine Cone. At first I wasn't sure if it was my style or not, but later one of my ladies made it and brought on one of our crops. OMG! That's exactly what I said! I wanted this box so bad...On top of that I already decided to get going on the Alice in Wonderland theme...
The top of the box was decorated with black lace and rhinestone ribbon,
Box (6)
with Tim Holtz clock gears and spinners. The Hatter was mounted on the chipboard and covered with Glossy Accents, which way it doesn't roll in.
Box (5)
The size of the box is H 5.5 inch, W 8 inch, L 11.5 inch
Box (4)
Sturdy box will hold photos, or candy depending on your preference.
Box (2)
Here I used Tim Holtz key, key hole, crystal door knob, and a swirl die cut.
The back view of the box
Box (3)
That is how I would use it if nobody snaps it
Box (8)
Happy Halloween!
Halloween in Wonderland Box
$46.99

P.S. Look for Halloween in Wonderland, bag (cans, banner) blog.


Pin It

Halloween in Wonderland, cans

Got a minute to sit down and write the post…
Does it happened to you sometimes, when you have such a grandiose planes and nothing gets done, at list not right the way? I have this happened to me all the time.
It’s funny because I gave the project to my Honey to build Me a wall mounted shelve for My punches. So each time I am starting to work on my project he would come and ask me a question about depth, length, etc. and here we go, I am on different planet…. Guess when I am getting back to my project? Maybe later this day, or in best the next day… Today he is playing golf, and hurray…
So, here is my post about Halloween in Wonderland Cans.
Love, love, love how those came out. Can’t even tell you which one is my Favorite, because they all unique!!!
PICT0016
I posted this set of 5 Halloween in Wonderland cans as a house decoration on my website www.natashascrapbookorner.com. So you can use it as nice addition for the rest of Halloween decoration that available: banners, cards, albums, tag books, etc.
Halloween cans
$29.00
But lets get to each one of these cans...
I used Halloween in Wonderland paper by Graphic 45, some extra embellishments, and some creativity...
First one is Eat Me! - 8 by 4 inches can, which will feet biscotti's or candies. Love the blue spiderwed paper mixed with Butterflies and misted flowers. Large size og the can allowed me to play with embellishments, so I put two beautiful butterflies next to rows of blooming flowers. Came out very nice!
Eat Me (3)
Eat Me (2)
Eat Me (4)
Second can is...
Twins - 4 by 2.5 inches soup can with separated lid (not sharp edges). Black lace around the picture makes this can look like antique piece.
Twins (1)
on the back I used Tim Holtz die swirl
Twins (2)
Third can is - Drink Me!
Drink Me
It is 3.5 by 2 inches can with twisted lid. Very cute little can, like Alice used to have in Wonderland. I really like this one!
Fourth is...
Tea Time.. Of course, what alse Alice is going to do in Wonderland? Drink some Tea!!!
Tea Time (1)
It's 3.5 by 4 inches can with the lid, can will feet tea bags or candy. With this can you never going to be Late for Tea!
Tea Time (4)
Tea Time (2)
with this elements I am telling you I can't decide which one of these 5 cans is the best....
And the last one, but so beautiful...
Can At Last!
At Last (3)
It's 4 by 2.5 inches can is the piece of Art.
At Last (2)
Twisted top, gorgeous flower with pin and tulles and cute little metal charm will impress you and your guests.
At Last (1)
Happy Halloween!
Enjoy it!

P.S. Look for the Halloween in Wonderland, box. Hopefully it won't take me as long as this post!!!!
Happy Holidays!!!


Pin It

Monday, October 24, 2011

Halloween in Wonderland, banner

Who doesn't like this fairy tale about Alice in Wonderland? I don't know anyone who does... Heard that people have different view on which one of the versions they like the most...
Anyway, I am not an exception, and love, love, love it!
So my love got an inspiration last year, when I saw a page layout of Alice in Wonderland. Beautiful layout, embellishments, photo, everything… So my move was to make me one, just like that. So I started gather together some materials here and there. It was already way pass Halloween, another holidays lined up... That project became one of the lots of lost in my bottom drawer ideas...
But, I set my mind on to get the whole theme Halloween in Wonderland going for the next year. Which is right now!!!
During this period I knock down one project after another, even bought little Alice costume for myself and looking forward to wear it this Halloween. All decorations are up, and I am finishing my mini album for lots of Wonderland 2011 pictures....
Here it is...
This in my two page layout
Alice in Wonderland

What a celebration without a banner?...

Halloween hanging Banner 36 inches long created with Graphic 45 paper Halloween in Wonderland series. Unique design, funny characters, and cute 3D embellishments: red roses, spiders, clips, etc will make your holiday decoration quick and pretty. Each die cut square has one letter and card or two with your favorite Alice in Wonderland characters. 9 squares for 9 letters in word Halloween.
Halloween (3)
Couple more pictures for U... Unfortunately not the best...
Halloween (7)
Halloween (8)
Halloween (9)
Top of the banner...
Halloween (6)


Boo Hanging Banner 55 inches long created with Graphic 45 paper Halloween in Wonderland series. Unique design, funny characters, and cute 3D embellishments: white rose, lace, ribbons, spider web, punched paper web, sprinkled letters. Just lots of FUN!
Boo Banner (6)
Little B
Boo Banner (2)
Middle O
Boo Banner (3)
Last O
Boo Banner (4)
That is not the end yet, look for Halloween in Wonderland, cans...
Halloween Banner
$18.99
Boo Banner
$18.99


Pin It

Tuesday, October 11, 2011

My shadowbox

Here it is my first shadowbox… I can’t describe you, how proud and pleased I am with it, keeping in mind that I have 0 experiences in mixed media art.
IMG_0119
I want to say special thank you to my girls – Barbara, Liz, Paula and Lisa who took their time and gave me some tips on how to start and what materials use in this project.
Putting together a life story in 12 windows is very challenging task.
Here is how I did it… http://youtu.be/H_BK7ZVwHWg?hd=1
P.S. I am always using the wrong name for the Clossy Accents, calling it Glaze. I did use Glossy Accents in this project.
I want to show you closer those elements I used.
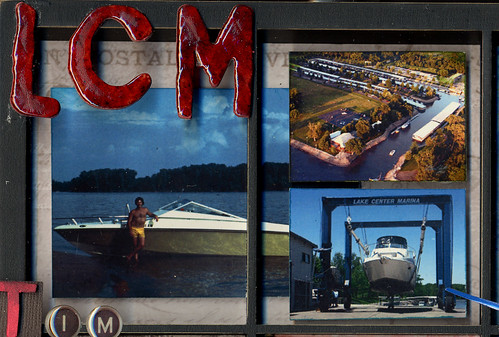
Shadow box 1 LCM
For the background I used Tim Holtz blue Post paper from his Vintage Shabby paper stash, next layer is done by cutting the picture in half and mounting it on the pop up dots, third layer of two smaller pictures on the right was created by doubling pop up dots, letters are grange board alphabet from Tim Holtz, inked with his distressed ink and finished with Glossy Accents.
All 3D embellishments: letters, charms, hinges, bottle, bullet, etc were glued with Glossy Accents…
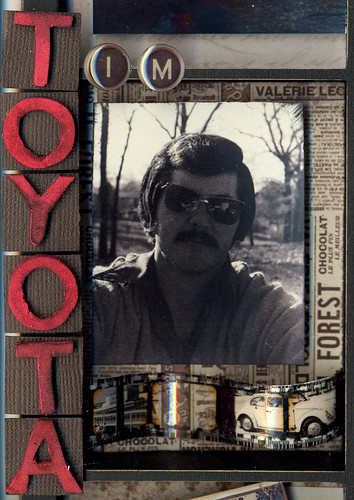
Shadow box 1 Toyota
Very interesting window – lots of ideas and techniques… The picture is on pop up dots, Tim Holtz Film Strip Ribbon glued with GA in three places (sides and middle to create a curve); mini pictures were sized down to the film opening and glued with GA from inside, and typesetting of letters on the left side was a brilliant Paula’s idea which came from one of the Tim Holtz tutorials (look for “Typesetting letters for my shadowbox” on YouTube by mynashka channel)
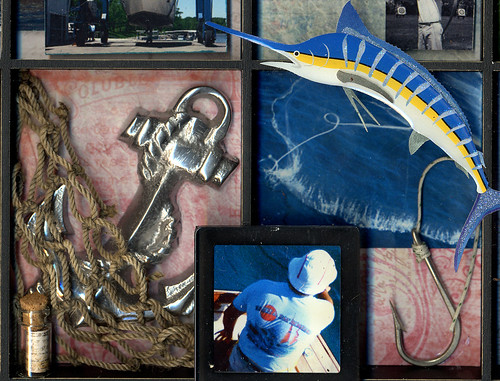
Shadow box 1 fishing
For these two windows I used pink vintage paper. At the left window I glued an anchor that I found at the sea food store, decorative net, mini bottle with a stripe of map paper inside. On the right side I cut out the net from printed picture and placed it right over background paper without any pop up dots to get dipper and father dimensional look. I had slide folder (the black frame around picture), so I cut picture of the fisherman to the size and using GA glued Tim Holtz clear square on top of the framed picture. To join both windows I mounted dried square picture on the border of the shadow box right in the middle. It just happened to bring those windows together visibly and give the depth and distance between man and net. The hook was last embellishment that I found in my husband’s fishing box. To block this theme from other windows I happened to buy a fish, which nicely feats the corner.
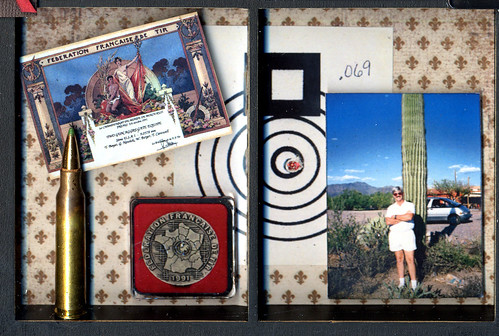
Shadow box 4
Pretty much the same techniques were used here. To join windows I split the target image and glued it the background paper highlight the hole in it with red stickles. Image of medal was done in the same manner as fisherman. For a bullet I asked someone who had it (hunters or you can find it at the gun show…think out of box). Diploma was printed as a mini and mounted on the double pop up dots. Picture on the right, and it’s done…
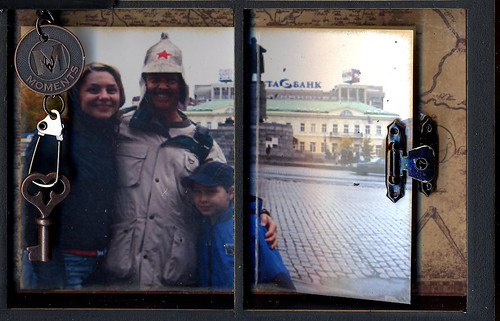
Shadow box 3 Russia
For a traveling I used map as a background, Tim Holtz swivel clasps and tokens. To create a door look I score the picture and glued the door hinge on it.
6232282914_eaf0e988c1
That’s a supply I used to create this shadowbox.
Thank you for login in! Nice creations to you!

Friday, October 7, 2011

Chipboard Album by Nata

Beautiful 6 page album made out of Chipboard Album Kit by Me & My Big ideas company. Gorgeous printed papers with the scallop edges matching chipboard pages, cute 3 layered butterflies, sparkly rhinestones, soft spoken word embellishments, florish stickers, bungle of pretty ribbons and more - making this album unique. It has planty of open spaces for your pictures and journaling. Album will make beautiful gift to your friend, kid, family member or just keep it for yourself and feel it up with your summer vacation pictures or Birthday party momorabilia.


Front view of album
IMG_0128
Closer look
IMG_0129
Page 1 back and front page 2
IMG_0130
Back of page 2 and front of page 3
IMG_0131
Closer look of page 3
IMG_0132
Back of page 3 and front of page 4
IMG_0133
Page 4 opened
IMG_0135
Page 5 front
IMG_0136
Page 5 embellishments
IMG_0137
Page 6 front
IMG_0139


Enjoy this beautiful album!


Chipboard Album by Nata
$20.00